Tuesday, July 13, 2010

Twinsies


Twin Needle HemmingMakes me happy. I am pretty short. and hippy.
not in a granola crunchy way, but in the way that when I find something that fits me, I usually have to chop off a few inches. This J.Crew dress was super cute and long. I needed to trim off a few inches.
Twin needle hemming is fantastic because it looks super professional and it helps prevent hems from rolling. It looks like 2 perfectly lined up rows of stitching on the front, and in the back creates a zig zag effect that holds the fabric flat. Because this zig zag covers over the edge, you also do not have to edge-finish your knitted garments. The finished item looks fantastic.

Tools -
Twin needle (made for knit fabric)
adapter for 2nd spool of thread
2 spools of thread, 1 bobbin
ruler

First step -
gather your supplies. Remove your current m
achine needle and place in a safe place for later use. Insert your Twin Needle. Now, set your machine up with the 2nd spool holder. Thread you
r machine so you have both top threads together like you would doing normal stitching. When you get to the needles, simply thread one thread into each hole. R
oll your fly wheel forward to pull up the bob
bin thread. Pull all three threads to the back.

2nd step -
Decide how much you want to hem your garment. If you are doing a major chop like me, be conservative. Sometimes the fabric is so heavy that when you remove a lot, the item might be too short when you cut off the excess. You can always change the depth of your hem or trim a bit more off when you are done.
I pinned my dress up 5 inches. I wanted a 1 inch hem. I should have cut off 4 inches, but I cut off 3 1/2 inches because this fabric was really heavy and weighted the hem down.

3rd step-
Cut your hem appropriately and iron in place. Place pins as you like perpendicular to the garment for easier removal. I actually don't always use pins for this. If you are confidant in it holding in place while you sew, just go for it. Just be accurate and consistent in your hem depth because you are sewing from the front.

4th step-
on the FRONT side of the garment, begin stitching. I usually use a slightly larger stitch length - I think it looks better. You want to line the stitching up so that on the back, the "zig zag" that is created is just barely on the edge of the hem fold itself.

5th step -
Stitch all the way around stretching very slightly. Be sure to back stitch at beginning and end. Press your new hem with some steam.
Back side of twin needle hemming:
Front side of twin needle hemming:

Tuesday, June 29, 2010

not for lack of doing...


Posting slows me down. Takes me away from doing and getting information on doing more. Gotta figure out a way to make it something I do more often. Anyway, here we go!
One of my many projects is these cute bags. I use them for everything from from Gift Cards to little trinkets to storage. These were made for cute silicone watches that we gifted to some of Birdie's teachers.
Easy to make -
Use a rectangle of fabric appropriate to the size gift you need. Be sure to leave a bit of ease esp. in length so the top closes properly.
-Make a snip in the sides about 1 1/2" inches down from the top and 1/2" in.

-Fold the edges in on this top and iron. If you want , you may top stitch this little flap down.
-Fold the top edge down 1/4" and press. Fold down again until you just go past the slide clips, but barely.
-Edge stitch this bottom seam closed.
-With right sides together, use a 1/2" seam and sew the side of bag and the bottom.
-snip your corners
-turn right side out and press.
-using a bodkin or safety pin, thread ribbon through
the casing, knot and you are ready to go!
**3/8" ribbon works perfectly for this project. If you
do a bigger bag, 7/8" ribbon is great also, but be sure to make your
casing larger as we
ll.
**If you make the bag as 2 separate sides instead of folding the rectangle, you end up with 2 holes in the casing - easy to feed ribbon through each side and make it a double drawstring. It's very secure and great for toys. This green bag was constructed like that but only has one ribbon inserted.
Have fun!

Friday, June 11, 2010


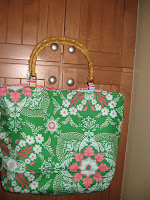
Finito. I thought it'd be cute to have my daughter's class come up with a gift for their teacher. I had them all draw on a square of paper, then I scanned them into the computer and printed the out onto computer fabric. Printed Treasures was the brand I used this time and I LOVE how crisp the ink and colors are. Will definitely buy it again. Once cut, I stitched them together, added a strip in between and on top and bottom. The result was a large rectangle. Well, 2 actually as there are 12 more blocks on the other side. I then trued up the sides and cut 2 lining pieces the same size. I also used a bit of poly fleece inside to give it some weight and heft. I LOVE it. The handles are traditional bamboo handles, but bigger. They have a 9" gap in between the handles. Super cute. I hope she likes it!
I also made it reversible so if she doesn't want the kids artwork hanging out or moves onto someplace else next year, it's still good to use. Now, I need a black one b/c I love it so much!


Tuesday, June 1, 2010

Confession

I must confess an obsession. Laminated cotton. For reals.
Notice something else? Sis Boom. Laminated cotton. I just wanted to type it again. It's fun. I might also be obsessed with that too. Don't tell Jen. We wouldn't want to worry her :0)
Need:
Sharp sewing machine needle
Walking foot for the machine
pins in the seam line
have fun!
I had the privilege of working with some of Jennifer's new laminated cotton and I'm sure you can't tell, I am SOOOO excited! about it. I love this print and it was perfection to work with. I've heard some people don't like to work with this new-fangled fabric, but with the right tools, it's super easy. This print was so cute and girly! Thanks Jen for the honor of playing with it!


Monday, May 31, 2010

Friday, May 21, 2010

Knit Picky

This is for Karen :0)
Knit fabric. Scary or not? I happen to like sewing on challenging fabric so at first glance, this seems to fit the bill. Except, it's SUPER easy. Like really easy. Cut the fabric wrong? Stretch it. Measured your body wrong. Stretch it.

Knits
Sewing needle: Stretch or Ball Point
Hem: Twin needle
Thread: Poly/Cotton or Poly
Pins: Ball Point (or use regular sharps within the seam allowance only) or Universal

There are basically a few types of knits - double knit, jersey knit, 2 way stretch.
Within that group, there are sub-categories, but for the most part, those 3 groups are enough info for now.
Double knit is the least stretchy - it's two layers of knit knitted together. It's stable, can be drapey, and can be fairly thin or fairly thick.
Jersey knit - your common t-shirt knit garden variety fabric. Stretches in one direction. Very user friendly and easily found.
2-way stretch- Love this stuff. Stretches in both directions. Has lots of flexibility- this can be good and bad. The hems have a tendency to rolllll. (we'll fix this idea later on)
All of the fabrics are available in a variety of fibers: cotton, poly, spandex, and now even bamboo.

-Pre-wash and dry your fabric. I know there are nay-sayers out there, but for me just do it.
-Be sure when choosing fabric for your pattern, you have chosen appropriately. Often, the commercial patterns that call for knit will actually have a gauge on the pattern back showing how much your fabric should stretch for it to fit properly.
-Change your machine needle to one (I use Schmetz) appropriate to your fabric. Let's be real, it sounds dumb, right? I know. But for real, change your needle.
I often use their "Universal" needle for everything I jam through my machine. These are actually fine for knit. A better one still is "Ball Point" - the purpose of this needle is to go through the fabric in between the knitted stitches as opposed to piercing through the fabric. This can make a hole and/or a run. Check out the seams on a cheap knitted garment from your closet and see what I mean. Holes. Gross.
They also make a "Jersey" needle. This are great for making bathing suits and such out of shiny spandex, but aren't necessary for a cotton jersey dress. Get the Ball Point needle and you are in shape.
-Sewing : stretch your seams a bit when you run them through. They will snap into place again when you are done, but this will prevent the thread at the seam from snapping while putting the garment on. We all have t-shirts where the shoulder seam has ripped out. Be honest. Be sure also to back stitch. You are much more likely to have a seam come undone on a knit than a cotton woven that you didn't back stitch. Hello J. Crew armpits.
-Edge finish. You can certainly leave the seam edges unfinished, but for peace of mind, I tend to always finish my seams with my serger (true love). If you don't have a serger, just a zig zag will do. Again, stretch your seam a small amount. This added reinforcement will be great should a seam snap. We don't want to see heineys hanging out. Buy a serger, it's the best $200 you've spent in awhile.
-Hemming- this is SUPER fun and very professional. Get yourself a "Twin Needle". It is a single shank (that thing that gets stuck up inside the machine and tightened with a screw to your machine) but with TWO needles sticking out the bottom. Check your manual to see where the 2nd spool of thread will go. My Viking has an attachment that you pop into a slot on the front of the machine. Other machines have an adapter that goes onto the bobbin winder. In any event, put 2 spool of thread onto the machine. You are stitching from the front, so choose the thread you want to see on the front side. Now, grab both threads together and thread the machine as normal. When you get to the needle, simply thread each one with one of the threads. It does not matter which thread you use, just thread them both.
Now, be sure to iron and pin your hem all the way around. Place your pins perpendicular to the fabric, it's easier to get them out. Top stitch your hem into place. You will have 2 perfectly even stitching lines on the front and a zig-zag that is formed on the back. The zig-zag offers a bit of stretch so you are in good shape from a utility point of view.
Twin needle hemming is cute with contrast stitching also so go crazy here! the point of the twin needle is to prevent the hem from rolling. The width of the needle stitching helps to stabilize the fabric enough so it can't roll.

I think that covers most of the issues with knitted fabrics. The great thing with them is how forgiving they are in both sewing and fit. Have a blast with them!
Did I miss anything? I hope not. If I did, let me know and I can try to answer your question.


Tuesday, May 4, 2010

Raining pink and cute


Seriously dying over how super cute this raincoat came out. Still mildly obsessed with the laminated cotton. The girl totally needed the raincoat today with very heavy downpours coming down at bus time! Good timing Mom!
Made the pattern myself and only have 1 change I'd like to make - love the foldover sleeve action, but they are about 1 inch too long - just too bulky - so that's fixed on my pattern and we are ready for another!
The outside is from Amy Butler's Love collection and the lining is super awesome Jennifer Paganelli's line - Matt's Tux. love the color coordinating action between the two.
The was probably completed in a couple hours - it was super simple, lined, a bit of elastic in the hood and a zipper. A bit of topstitching and wa-la. Love it! So does the girl.