Tuesday, June 29, 2010

not for lack of doing...


Posting slows me down. Takes me away from doing and getting information on doing more. Gotta figure out a way to make it something I do more often. Anyway, here we go!
One of my many projects is these cute bags. I use them for everything from from Gift Cards to little trinkets to storage. These were made for cute silicone watches that we gifted to some of Birdie's teachers.
Easy to make -
Use a rectangle of fabric appropriate to the size gift you need. Be sure to leave a bit of ease esp. in length so the top closes properly.
-Make a snip in the sides about 1 1/2" inches down from the top and 1/2" in.

-Fold the edges in on this top and iron. If you want , you may top stitch this little flap down.
-Fold the top edge down 1/4" and press. Fold down again until you just go past the slide clips, but barely.
-Edge stitch this bottom seam closed.
-With right sides together, use a 1/2" seam and sew the side of bag and the bottom.
-snip your corners
-turn right side out and press.
-using a bodkin or safety pin, thread ribbon through
the casing, knot and you are ready to go!
**3/8" ribbon works perfectly for this project. If you
do a bigger bag, 7/8" ribbon is great also, but be sure to make your
casing larger as we
ll.
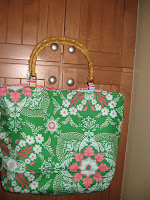
**If you make the bag as 2 separate sides instead of folding the rectangle, you end up with 2 holes in the casing - easy to feed ribbon through each side and make it a double drawstring. It's very secure and great for toys. This green bag was constructed like that but only has one ribbon inserted.
Have fun!

Friday, June 11, 2010


Finito. I thought it'd be cute to have my daughter's class come up with a gift for their teacher. I had them all draw on a square of paper, then I scanned them into the computer and printed the out onto computer fabric. Printed Treasures was the brand I used this time and I LOVE how crisp the ink and colors are. Will definitely buy it again. Once cut, I stitched them together, added a strip in between and on top and bottom. The result was a large rectangle. Well, 2 actually as there are 12 more blocks on the other side. I then trued up the sides and cut 2 lining pieces the same size. I also used a bit of poly fleece inside to give it some weight and heft. I LOVE it. The handles are traditional bamboo handles, but bigger. They have a 9" gap in between the handles. Super cute. I hope she likes it!
I also made it reversible so if she doesn't want the kids artwork hanging out or moves onto someplace else next year, it's still good to use. Now, I need a black one b/c I love it so much!


Tuesday, June 1, 2010

Confession

I must confess an obsession. Laminated cotton. For reals.
Notice something else? Sis Boom. Laminated cotton. I just wanted to type it again. It's fun. I might also be obsessed with that too. Don't tell Jen. We wouldn't want to worry her :0)
Need:
Sharp sewing machine needle
Walking foot for the machine
pins in the seam line
have fun!
I had the privilege of working with some of Jennifer's new laminated cotton and I'm sure you can't tell, I am SOOOO excited! about it. I love this print and it was perfection to work with. I've heard some people don't like to work with this new-fangled fabric, but with the right tools, it's super easy. This print was so cute and girly! Thanks Jen for the honor of playing with it!